If you have not checked out how to set up GMail with split emails, please check it out here. Having GMail (split emails), labels and filters set up first will save you headaches when setting up Dropbox accounts for your students.
Create Account (Teacher)
You will need to create one account as your teacher account. One drawback is that when you share folders, this counts against your stored space. So if you have a total of 2 Gigabytes of storage and you have folders shared with your students and the total of their shared folders is 1 Gigabyte, then your teacher account will actually only have 1 Gigabyte left of storage. If you plan ahead, you can refer (from the teacher account) to your student accounts to get bonus space.
1) Go to Dropbox to create your teacher account
2) You will be the only one that will need the username/password for this account.
Create Account (Students)
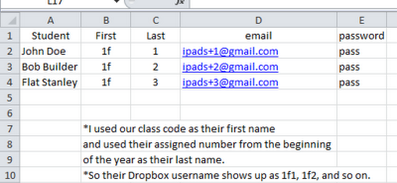
This part is a little trickier. I recommend creating a spreadsheet to keep track of your students accounts and information. Here is an example of a spreadsheet.
You will need to create one account as your teacher account. One drawback is that when you share folders, this counts against your stored space. So if you have a total of 2 Gigabytes of storage and you have folders shared with your students and the total of their shared folders is 1 Gigabyte, then your teacher account will actually only have 1 Gigabyte left of storage. If you plan ahead, you can refer (from the teacher account) to your student accounts to get bonus space.
1) Go to Dropbox to create your teacher account
2) You will be the only one that will need the username/password for this account.
Create Account (Students)
This part is a little trickier. I recommend creating a spreadsheet to keep track of your students accounts and information. Here is an example of a spreadsheet.
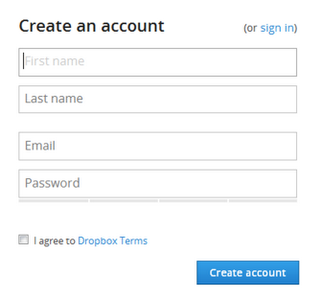
1) Go to Dropbox to create a student account for each student.
2) In the first name box you can use whatever. I used my class code (1f)
3) In the last name box you can use whatever. I used a unique number that each student is assigned at the start of the year (#'s 1-20)
4) Email---> this is where you GMail splitting comes into play. Read here to find out more about GMail splitting.
5) Email--> use your first numbered GMail. (Ex. [email protected])
6) Password---> create a unique password for each student.
7) Repeat this process for each student
***Since I am sharing iPads, I wanted a way to use Dropbox year after year. That is why I matched my numbered GMail email to each unique student's number. I give each student a number to start the year so I do not have to label so much stuff each year.
Shared Folder (Student)
1) Log into your teacher account you created.
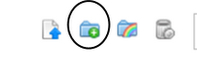
2) Click the "new folder" icon at the top of your dashboard.
1) Log into your teacher account you created.
2) Click the "new folder" icon at the top of your dashboard.
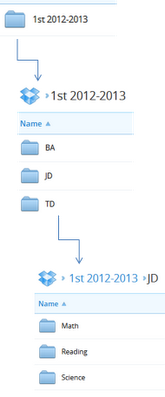
3) Name the folder. For my teacher account I created a main folder titled "PDF Expert" This was to work with the APP PDF Expert. Read about how I used PDF Expert here. You could also name it by your class and year. (Ex. 1st 2012-2013)
4) Open up your newly created folder. Click the add folder icon again. Name this folder for your first student. I used my student's initials.
5) Open up your newly created student folder and click add new folder. Name it for a subject like math. Repeat for other subjects.
4) Open up your newly created folder. Click the add folder icon again. Name this folder for your first student. I used my student's initials.
5) Open up your newly created student folder and click add new folder. Name it for a subject like math. Repeat for other subjects.
Shared Folder (Class)
Sometimes you may want to share a file with all your students. Instead of having to go into each student's shared folder and insert the file, you can instead create one folder to share with the entire class.
1) Log into your main Dropbox account.
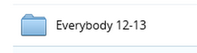
2) Create a new folder and title it whatever you would like. (Ex. Everyone 12-13)
Sometimes you may want to share a file with all your students. Instead of having to go into each student's shared folder and insert the file, you can instead create one folder to share with the entire class.
1) Log into your main Dropbox account.
2) Create a new folder and title it whatever you would like. (Ex. Everyone 12-13)
3) After you have created this folder, you will need to share it with all your students. To do this, click on your newly created folder and open it up
4) Next, click the folder icon at the top that has a rainbow on it. (If you hover, it should say "Share this folder." Click it and add all your student emails.
4) Next, click the folder icon at the top that has a rainbow on it. (If you hover, it should say "Share this folder." Click it and add all your student emails.

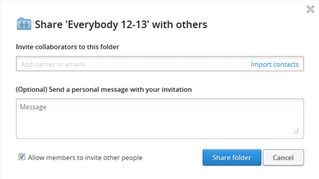
5) It may take some time to type in all their emails. Also, after you click share folder, for primary grades, it would be best to log into each of your students' accounts and approve the shared folder.
6) Now when you put a file into the shared "everybody 12-13" folder, it will automatically show up in each of your students' Dropbox accounts
6) Now when you put a file into the shared "everybody 12-13" folder, it will automatically show up in each of your students' Dropbox accounts
